nginx proxy_pass直接代理方法到外网失败 内网成功
NGINX stream (4层解决方案) HTTP CONNECT隧道 (7层解决方案)链接:
https://blog.csdn.net/qq_34777982/article/details/110439315
防爬虫链接:
https://blog.csdn.net/zzhongcy/article/details/109293532
https://www.cnblogs.com/phlive/p/13466534.html
正向代理和反向代理
正向代理
4层代理TCP/UDP比7层代理HTTP、HTTPS、RTMP、SMTP配置更加复杂,需要一个端口对应一个目标服务器。
client>>正向代理>>internet>>server
通过正向代理服务器,隐藏客户端信息,匿名访问。
通过正向代理服务器,访问无法直接访问的资源。
做缓存,加速访问资源。
反向代理
client>>internet>>反向代理>>server
通过反向代理服务器,解决跨域问题。
通过反向代理服务器,统一访问入口。
通过反向代理服务器,避免暴露真实服务端信息,提高安全性。
通过反向代理服务器,实现负载均衡。
七层非透明正向代理 connect 隧道
http connect 隧道
七层解决方案是在应用层来进行解决的,并不存在对数据包进行解密的一个过程。它需要通过http connect来建立一个隧道(通俗理解就是一个指定的用来连接的通道),这里需要在客户端配置https代理服务器的ip和端口。
因为http正向代理使用的是get请求,但是https使用的却是connect请求,而nginx不支持connect请求。
所以需要第三方模块ngx_http_proxy_connect_module 来支持https的正向代理。
具体连接过程如下:
1、客户端给代理服务器发送http connect请求,并将要访问的url一并发给代理服务器;
2、代理用客户端发来的url去到dns服务器找到对应的ip,连上443端口;
3、代理连上服务端443端口后,给客户端发送一个HTTP/1.1 200 Connection Established(即http200响应);
4、此时客户端和代理服务器成功建立一个http connect隧道;
5、客户端发送https流量给到代理服务器,代理服务器直接将此https流量直接发送给到服务器;
至此,整个七层的http connect隧道就建立成功,换句话说就是成功搭建了nginx正向代理https服务。
下载包
http://nginx.org/download/
https://github.com/chobits/ngx_http_proxy_connect_module/
上传解压包

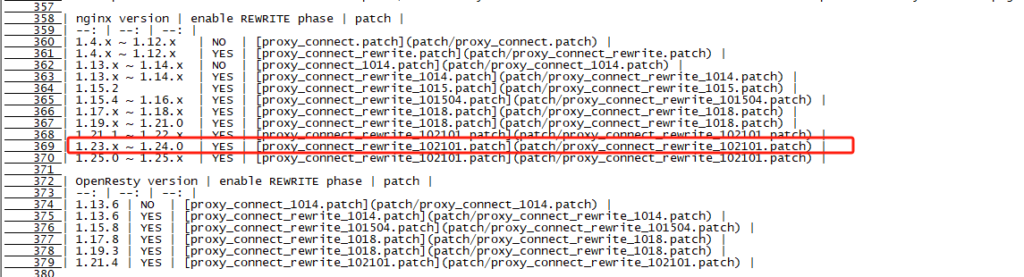
nginx版本匹配的模块
安装环境依赖、patch打补丁导入第三方模块、源码安装nginx
安装环境依赖
yum -y update && yum -y install make gcc openssl openssl-devel pcre-devel patch libxml2 libxml2-devel libxslt-devel perl-devel perl-ExtUtils-Embed gperftools gd-devel zlib zlib-devel
源码安装nginx时报错信息已经解决办法:
1./configure: error: the HTTP XSLT module requires the libxml2/libxslt
yum -y install libxml2 libxml2-devel libxslt-devel
2./configure: error: perl module ExtUtils::Embed is required
yum -y install perl-devel perl-ExtUtils-Embed
3../configure: error: the Google perftools module requires the Google perftools
yum install –y gperftools
4../configure: error: the HTTP image filter module requires the GD library.
yum -y install gd-devel
5../perl 5.6.1 or higher is required 出现这个的原因是因为 perl 版本太低了,需要进行升级。
6./configure: error: the HTTP gzip module requires the zlib library.
yum install -y zlib-devel
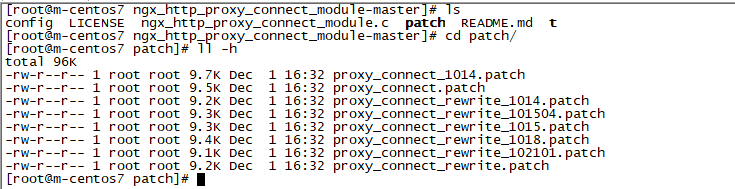
导入第三方模块 进入nginx目录下
[root@m-centos7 nginx-1.24.0]# patch -p1 < /usr/local/src/ngx_http_proxy_connect_module-master/patch/proxy_connect_rewrite_102101.patch
patching file src/http/ngx_http_core_module.c
patching file src/http/ngx_http_parse.c
patching file src/http/ngx_http_request.c
Hunk #1 succeeded at 1100 (offset -2 lines).
Hunk #2 succeeded at 1744 (offset -2 lines).
Hunk #3 succeeded at 2047 (offset -26 lines).
patching file src/http/ngx_http_request.h
Hunk #1 succeeded at 416 (offset 2 lines).
patching file src/http/ngx_http_variables.c
[root@m-centos7 nginx-1.24.0]#
源码安装nginx
useradd nginx
[root@m-centos7 nginx-1.24.0]# ./configure –prefix=/usr/share/nginx –sbin-path=/usr/sbin/nginx –modules-path=/usr/lib64/nginx/modules –conf-path=/etc/nginx/nginx.conf –error-log-path=/var/log/nginx/error.log –http-log-path=/var/log/nginx/access.log –http-client-body-temp-path=/var/lib/nginx/tmp/client_body –http-proxy-temp-path=/var/lib/nginx/tmp/proxy –http-fastcgi-temp-path=/var/lib/nginx/tmp/fastcgi –http-uwsgi-temp-path=/var/lib/nginx/tmp/uwsgi –http-scgi-temp-path=/var/lib/nginx/tmp/scgi –pid-path=/run/nginx.pid –lock-path=/run/lock/subsys/nginx –user=nginx –group=nginx –with-compat –with-debug –with-file-aio –with-google_perftools_module –with-http_addition_module –with-http_auth_request_module –with-http_dav_module –with-http_degradation_module –with-http_flv_module –with-http_gunzip_module –with-http_gzip_static_module –with-http_image_filter_module=dynamic –with-http_mp4_module –with-http_perl_module=dynamic –with-http_random_index_module –with-http_realip_module –with-http_secure_link_module –with-http_slice_module –with-http_ssl_module –with-http_stub_status_module –with-http_sub_module –with-http_v2_module –with-http_xslt_module=dynamic –with-mail=dynamic –with-mail_ssl_module –with-pcre –with-pcre-jit –with-stream=dynamic –with-stream_ssl_module –with-stream_ssl_preread_module –with-threads –with-cc-opt=’-O2 -g -pipe -Wall -Wp,-D_FORTIFY_SOURCE=2 -fexceptions -fstack-protector-strong –param=ssp-buffer-size=4 -grecord-gcc-switches -m64 -mtune=generic -fPIC’ –with-ld-opt=’-Wl,-z,relro -Wl,-z,now -pie’ –add-module=/usr/local/src/ngx_http_proxy_connect_module-master && make && make install
把 Nginx 服务配置为在 Systemd 监管下的服务
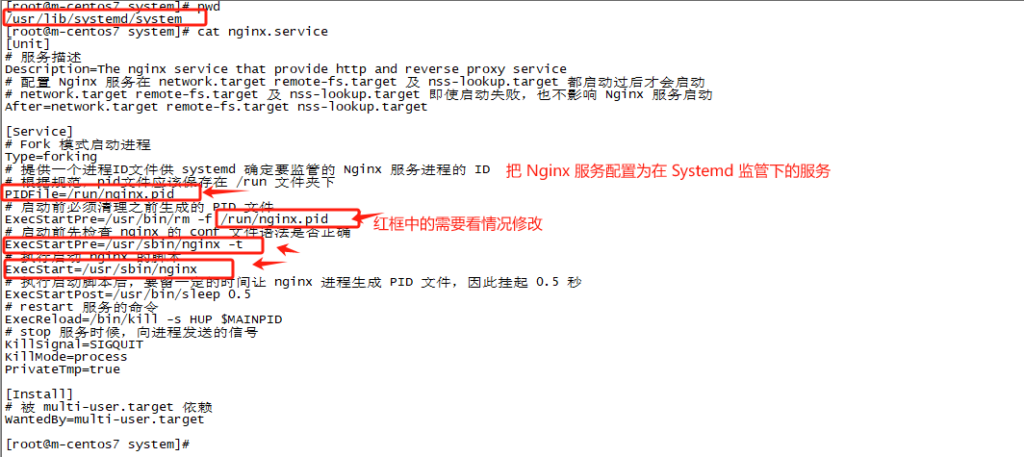
[Unit]
# 服务描述
Description=The nginx service that provide http and reverse proxy service
# 配置 Nginx 服务在 network.target remote-fs.target 及 nss-lookup.target 都启动过后才会启动
# network.target remote-fs.target 及 nss-lookup.target 即使启动失败,也不影响 Nginx 服务启动
After=network.target remote-fs.target nss-lookup.target
[Service]
# Fork 模式启动进程
Type=forking
# 提供一个进程ID文件供 systemd 确定要监管的 Nginx 服务进程的 ID
# 根据规范,pid文件应该保存在 /run 文件夹下
PIDFile=/run/nginx.pid
# 启动前必须清理之前生成的 PID 文件
ExecStartPre=/usr/bin/rm -f /run/nginx.pid
# 启动前先检查 nginx 的 conf 文件语法是否正确
ExecStartPre=/usr/sbin/nginx -t
# 执行启动 nginx 的脚本
ExecStart=/usr/sbin/nginx
# 执行启动脚本后,要留一定的时间让 nginx 进程生成 PID 文件,因此挂起 0.5 秒
ExecStartPost=/usr/bin/sleep 0.5
# restart 服务的命令
ExecReload=/bin/kill -s HUP $MAINPID
# stop 服务时候,向进程发送的信号
KillSignal=SIGQUIT
KillMode=process
PrivateTmp=true
[Install]
# 被 multi-user.target 依赖
WantedBy=multi-user.target
#systemctl status nignx 查看nginx状态
#systemctl stop nignx 停止nginx
#systemctl restart nignx 重启nginx
# systemctl enable nginx 自启动nginx
#journalctl -p err -b 可以查看系统错误日志
nginx.conf 配置正向代理https
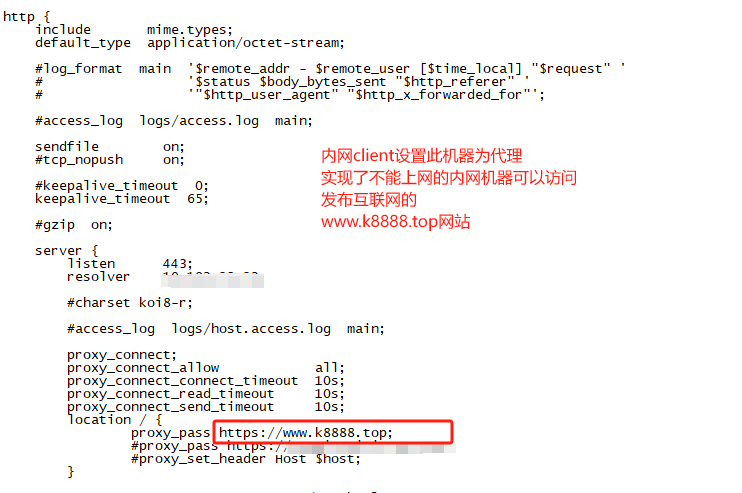
server {
    listen 443;
    resolver DNS地址;

    #charset koi8-r;

    #access_log  logs/host.access.log  main;

    proxy_connect; #启用nginx代理CONNECT 就能使用https
    proxy_connect_allow            all; #CONNECT可代理的端口
    proxy_connect_connect_timeout  10s;
    proxy_connect_read_timeout     10s;
    proxy_connect_send_timeout     10s;
    location / {
            proxy_pass https://www.k8888.top;
            #proxy_pass  $proxy_host;#实现了代理其客户端所有的请求
    }
转载于 https://blog.csdn.net/LG_15011399296/article/details/125409060
参数解释:
proxy_set_header 允许重新定义或者添加发往后端服务器的请求头
$host变量的值按照如下优先级获得:
$host是客户端请求的host
1、请求行中的host.
2、请求头中的Host头部.
3、与一条请求匹配的server name.
$http_host:客户端请求的目标ip地址
$request_uri;请求的资源
$remote_addr:值为客户端的ip
$proxy_host:代理服务器请求的host
$proxy_port:代理服务器请求的端口
$http_x_real_ip:客户端的X-Real-IP的值
X-Real-IP 通常被 HTTP 代理用来表示与它产生 TCP 连接的设备 IP
X-Forwarded-For 它代表客户端,请求端真实的IP
proxy_set_header X-Forwarded-For $remote_addr
proxy_set_header X-Forwarded-For $proxy_add_x_forwarded_for
代理到后端的TCP链接超时
proxy_connect_timeout time;
proxy_connetc_timeout 60s; 超时时间为60秒
Windows 2008设置全局代理
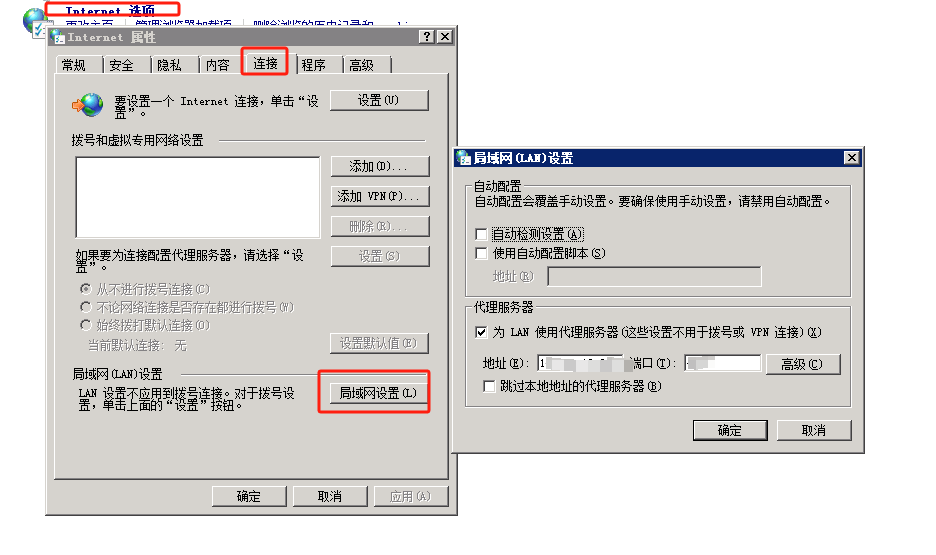
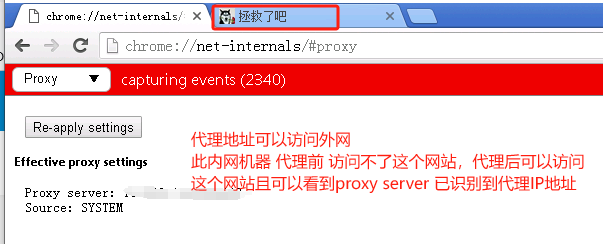
Windows 2008验证代理是否正常
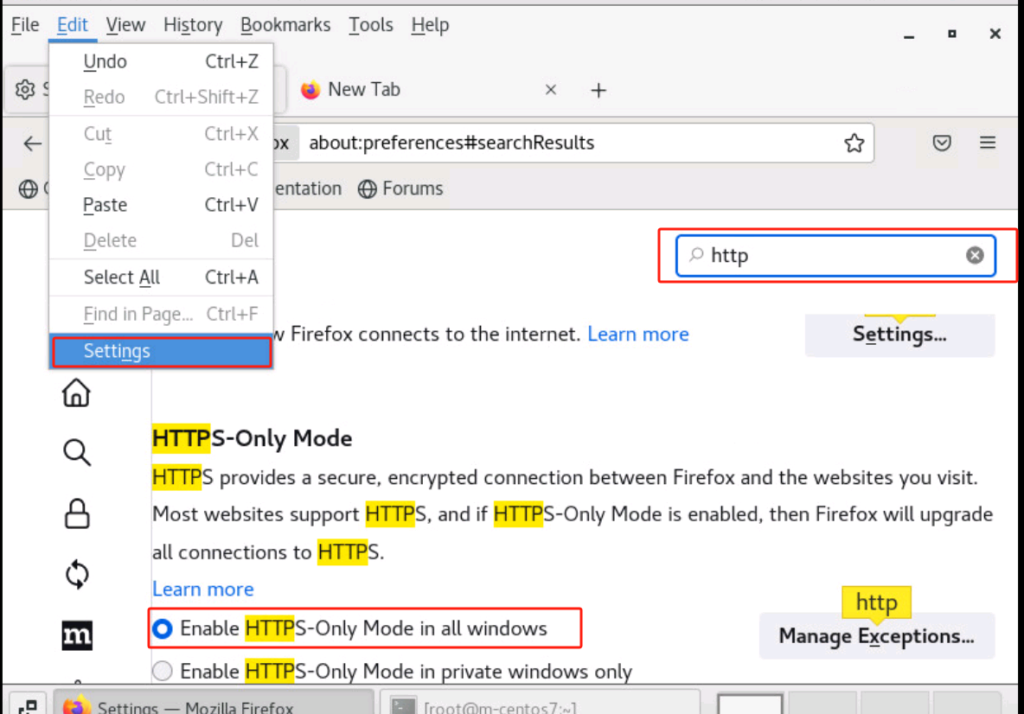
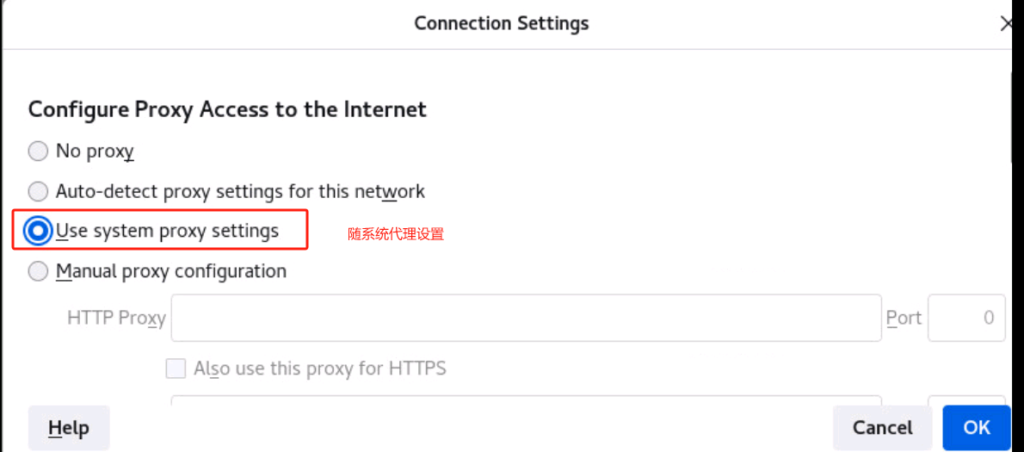
centos 客户端firefox火狐浏览器设置代理
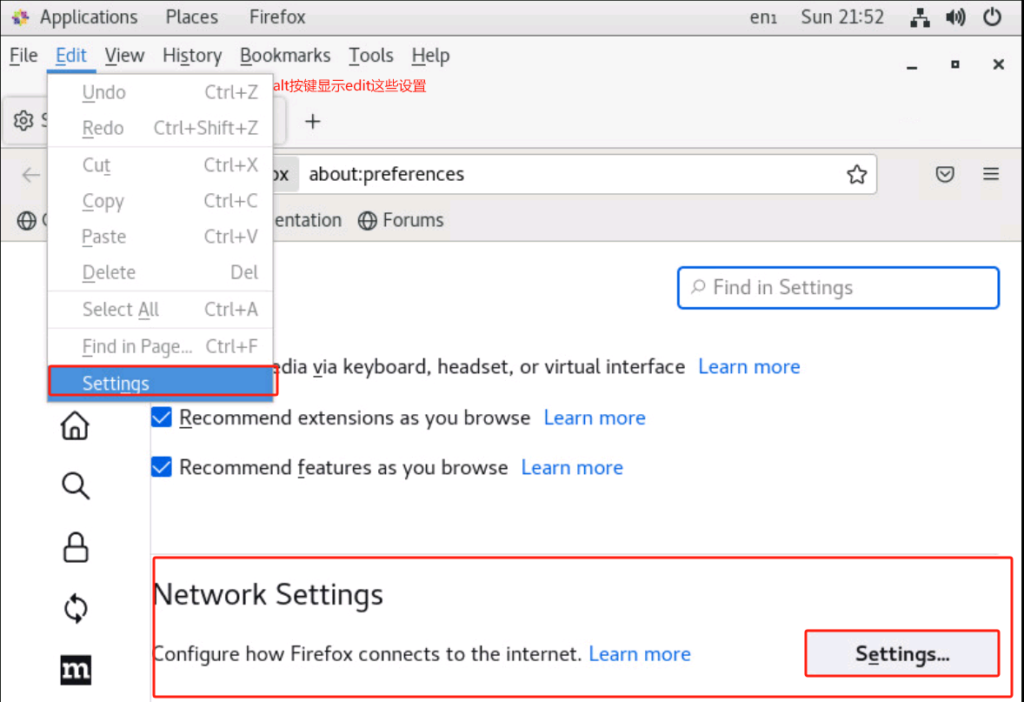

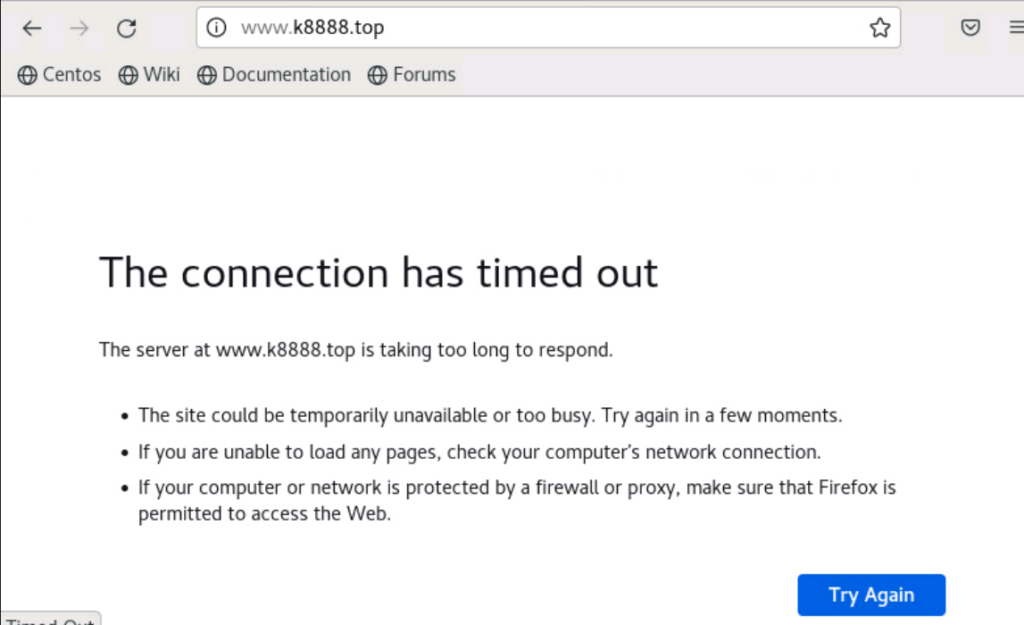
设置代理之前centos客户端访问不到https://www.k8888.top网址 设置之后可以访问到
注意!!!!
浏览器中输入https://www.k8888.top/访问成功
直接输入域名是http://www.k8888.top/访问不成功原因是火狐浏览器设置了不跳转https
使火狐浏览器跳转到https解决方法:
centos 客户端设置全局代理
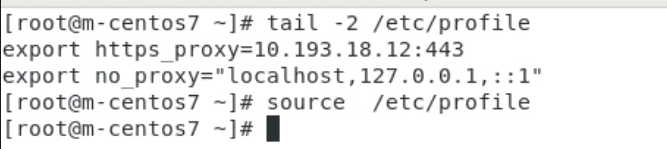
export https_proxy=10.193.18.12:443
export no_proxy=”localhost,127.0.0.1,::1″
source 使其生效
curl 时候报错 报的错误状态码是405 而我405状态码是我网站(www.k8888.top)防爬虫的状态码
原因是curl工具被禁用抓取了 所以#注释即可
“GET / HTTP/1.1” 405 150 “-” “curl/7.29.0” “-“

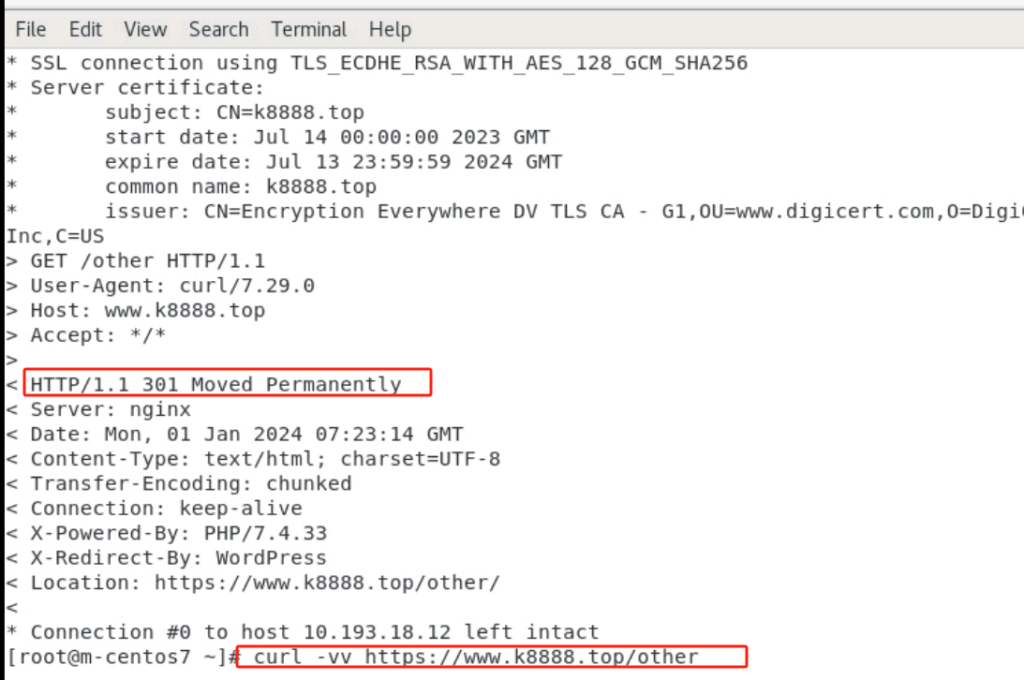
curl -vv https://www.k8888.top/other验证成功 切记要验证多级目录下的url
遗留问题 全局代理用centos自带的火狐浏览器访问网站超时 (已设置了随系统代理)